Infrastructure as Code with Terraform — Terraform 101
Infrastructure as code with terraform for beginners by using the Azure.

Software Engineer | Blogger
1. What is infrastructure as code(IaC)?
Basically, Infrastructure as Code (IaC) refers to the increasingly common practice of using code to provision and manage IT infrastructure. Its means, managing your IT infrastructure using configuration files. For example, You’re treating your servers, databases, networks, and other infrastructure as if they were software. This code can also assist you in rapidly and consistently configuring and deploying various infrastructure components.
IaC enables you to automate infrastructure deployment in a continuous and consistent manner, which offers several advantages.
2. Benefits of IaC
Everything Codified
The main advantage of IaC is that it allows for explicit coding of configuration files in use. You may share codes with the team, test them for correctness, maintain consistency, and integrate the infrastructure into the same IaC flow.
Speed
IaC enhances a company’s IT architecture and workflow since it leverages automation to significantly speed up infrastructure development, testing, and production.
Cost
Without any doubt, one of the most significant advantages of IaC is the reduction of infrastructure management costs. Engineers save time and money by having everything automated and organized and this time and money may be better spent on other manual duties and higher-value occupations.
Version Controlling
We could check in the infrastructure configurations into version control systems like GitHub and begin versioning them now that they are documented.
Now we have an idea about IaC. Let’s move to Terraform!
3. So, What is this Terraform?
Terraform is an open-source tool created by HashiCorp that allows you to define and provision infrastructure resources using a simple, declarative language. It can manage resources across multiple cloud providers, including Amazon Web Services (AWS), Google Cloud Platform (GCP), and Microsoft Azure. Terraform uses a state file to keep track of the current state of your infrastructure, and it can create a plan for changes to that infrastructure before making any modifications.
4. Workflow of Terraform
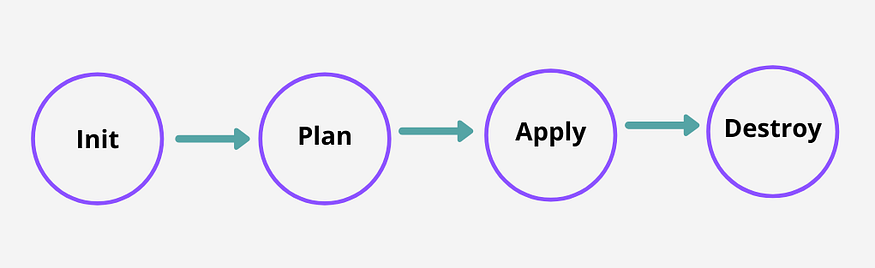
Terraform Init
After writing the code, we need to initialize the code. This terraform Init command is used to initialize a working directory that contains the terraform configuration files. Before Terraform can use the provider, it must be initialized. And also, the provider’s plugin is downloaded and installed during initialization so that it may be used afterward.
Terraform plan
This terraform plan command is used to create an execution plan. This command is a quick and handy way to see if the execution plan for a set of changes meets our expectations without affecting real resources or the state.
Terraform Apply
This terraform apply command is used to create or introduce the changes into real infrastructure. This command is scanning for configuration changes in the current working directory and makes the necessary adjustments by default. Also, this will write data to the terraform.tf state file. Then, when the application is completed, the resources that we applied are immediately available.
Terraform Destroy
When we need to destroy the managed infrastructure, we could use terraform destroy command.
5. Simple Demo: Creating Azure SQL database
This is a simple demo in that I’ll show you how to create an Azure SQL database by using terraform.
Prerequisite
Install the terraform
Install the Azure CLI
Azure subscription
Install Terraform Extension for VS code (I’ll use VS Code as IDE for this demo)
So you guys also can start with me! Let’s Start!!!
1. First, create a folder and then create the main.tf file as the main file inside that folder. The file’s very first component includes details about the provider we’ll be using in the setup. Azure, AWS, or any other accessible provider can be used. Declare the providers with a specified version so that our setup doesn’t break when the service we’re using gets a new version.
# Provides configuration details for Terraform
terraform {
  required_providers {
    azurerm = {
      source  = "hashicorp/azurerm"
      version = "~>2.31.1"
    }
  }

}
# Provides configuration details for the Azure Terraform provider
provider "azurerm" {
  features {

  }
}
2. When we need to create any resource in Azure, First we have to create a resource group inside the subscription. For that, I add the resource group as a resource in the existing configuration code. and we have to pass in two required variables for name and location for our resource group.
# Provides configuration details for Terraform
terraform {
  required_providers {
    azurerm = {
      source  = "hashicorp/azurerm"
      version = "~>2.31.1"
    }
  }

}

# Provides configuration details for the Azure Terraform provider
provider "azurerm" {
  features {

  }
}

# Provides the resource group to Logically contain resources
resource "azurerm_resource_group" "rg" {
  name     = "${var.name}"
  location = "${var.location}"
  tags = {
    environment = "dev"
    source      = "Terraform"
  }
}
3. Then need to create Azure SQL Server for SQL database. for that add the azure SQL server resource block into the configuration file. In that case, we have to add few configurations as variables that we could see in the below code.
# Provides configuration details for Terraform
terraform {
  required_providers {
    azurerm = {
      source  = "hashicorp/azurerm"
      version = "~>2.31.1"
    }
  }

}

# Provides configuration details for the Azure Terraform provider
provider "azurerm" {
  features {

  }
}

# Provides the resource group to Logically contain resources
resource "azurerm_resource_group" "rg" {
  name     = "${var.name}"
  location = "${var.location}"
  tags = {
    environment = "dev"
    source      = "Terraform"
  }
}

# Provide the sql server resource details to create sql server
resource "azurerm_sql_server" "example" {
  name                         = "${var.servername}"
  resource_group_name          = "${var.name}"
  location                     = "${var.location}"
  version                      = "12.0"
  administrator_login          = "yohan"
  administrator_login_password = "terraform-123"

  tags = {
    environment = "${var.devtag}"
  }
}
4. Then we have to create a storage account for creating an azure SQL database. In that case, we have to add a storage account resource block with configurations that it needs into the configuration file.
# Provides configuration details for Terraform
terraform {
  required_providers {
    azurerm = {
      source  = "hashicorp/azurerm"
      version = "~>2.31.1"
    }
  }

}

# Provides configuration details for the Azure Terraform provider
provider "azurerm" {
  features {

  }
}

# Provides the resource group to Logically contain resources
resource "azurerm_resource_group" "rg" {
  name     = "${var.name}"
  location = "${var.location}"
  tags = {
    environment = "dev"
    source      = "Terraform"
  }
}

# provide the sql server resource details to create sql server
resource "azurerm_sql_server" "example" {
  name                         = "${var.servername}"
  resource_group_name          = "${var.name}"
  location                     = "${var.location}"
  version                      = "12.0"
  administrator_login          = "yohan"
  administrator_login_password = "terraform-123"

  tags = {
    environment = "${var.devtag}"
  }
}

# Provide azure storgae account resource details for create storage account
resource "azurerm_storage_account" "example" {
  name                     = "${var.storagename}"
  resource_group_name      = "${var.name}"
  location                 = "${var.location}"
  account_tier             = "Standard"
  account_replication_type = "LRS"
}
5. Then we could create an Azure SQL database. For that, we have to add a SQL database resource block with configurations that need to provide the details in the configuration file.
# Provides configuration details for Terraform
terraform {
  required_providers {
    azurerm = {
      source  = "hashicorp/azurerm"
      version = "~>2.31.1"
    }
  }

}

# Provides configuration details for the Azure Terraform provider
provider "azurerm" {
  features {

  }
}

# Provides the resource group to Logically contain resources
resource "azurerm_resource_group" "rg" {
  name     = "${var.name}"
  location = "${var.location}"
  tags = {
    environment = "dev"
    source      = "Terraform"
  }
}

# Provide the sql server resource details to create sql server
resource "azurerm_sql_server" "example" {
  name                         = "${var.servername}"
  resource_group_name          = "${var.name}"
  location                     = "${var.location}"
  version                      = "12.0"
  administrator_login          = "yohan"
  administrator_login_password = "terraform-123"

  tags = {
    environment = "${var.devtag}"
  }
}

# Provide azure storgae account resource details for create storage account
resource "azurerm_storage_account" "example" {
  name                     = "${var.storagename}"
  resource_group_name      = "${var.name}"
  location                 = "${var.location}"
  account_tier             = "Standard"
  account_replication_type = "LRS"

}

#Provide azure sql database resource details for create sql database
resource "azurerm_sql_database" "example" {
  name                = "${var.dbname}"
  resource_group_name = "${var.name}"
  location            = "${var.location}"
  server_name         = "${var.servername}"

  extended_auditing_policy {
    storage_endpoint                        = azurerm_storage_account.example.primary_blob_endpoint
    storage_account_access_key              = azurerm_storage_account.example.primary_access_key
    storage_account_access_key_is_secondary = true
    retention_in_days                       = 6
  }

  tags = {
    environment = "${var.devtag}"
  }
}
6. We use variables for the resource name, location, and many other that you could see in the above code. so our next step is to create a file called variables.tf and this file where we will define what input variables we need for our build such as resource-groupname, location, and so on to make sure we don't hardcode anything inside the main terraform file. So, You have already seen where these variables are used in the main file above.
variable "name" {
  type    = string
  default = "azterraform101"
}

variable "location" {
  type    = string
  default = "EastAsia"
}

variable "servername" {
  type    = string
  default = "example-sqlserver"
}

variable "storagename" {
  type    = string
  default = "exmplestorage"
}

variable "dbname" {
  type    = string
  default = "example-qldb"
}

variable "devtag" {
  type    = string
  default = "development"
}
So now, you could see the above configuration code for variables. type is set a type of variables such as string, list, and map. then the default is set a default value of the variable.
7. Now we are done with the code. Now we have to validate and deploy the recourse.
For that, first, we need to log in to Azure by using the az login command. for that, we need to install the Azure CLI module as I told early.
az login
Use the terminal in the VS Code and type the following command and Login to your Azure Account.
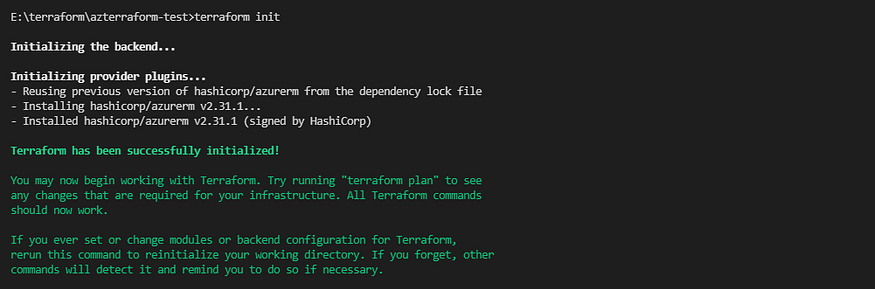
After that, run the terraform init command to initialize the provides in our terraform code. when run this command, it will create the local directory called .terrafrom for the terraform providers.
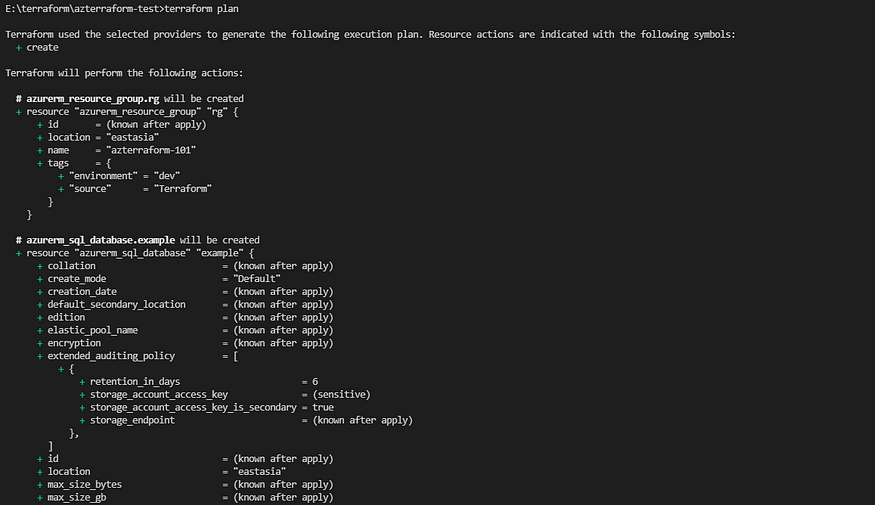
Then, The following step is to plan and see what will be deployed in Azure once the terraform code is executed. To discover what resources will be deployed in your Azure Subscription, use the command terraform plan. In this stage, Terraform is going to plan the configuration against our Azure environment and not going to deploy anything into the azure environment.
Now, the last step to perform is to apply the changes and wait for the terraform to build the infrastructure defined in our main file. Run the terraform apply command and wait for it to complete the deployment and ensure to enter “yes” once prompted to confirm, in the terminal session.
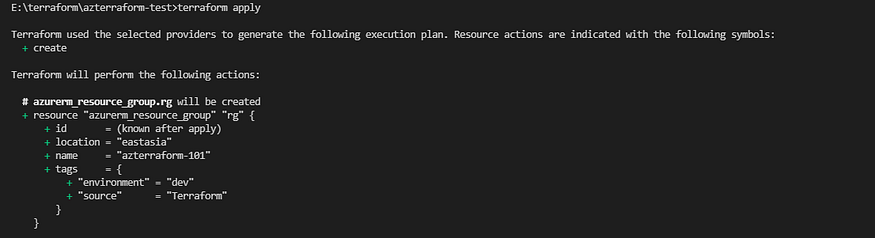
Terraform apply command
After this process, you could see the resources from the Azure portal.
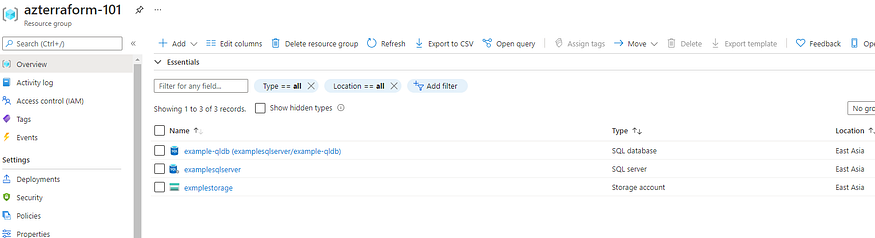
When the deployment is completed, we could use the resources for our tasks. when we need to clean up the environment, we could use terraform destroy command clean up the environment.

I hope you guys learned the basics of Terraform and how you use terraform with azure to provisioned IaC project. As a developer, I think the Infrastructure as code concept is something good move that needs to care about.
See you again soon with another article!
Happy coding!! Happy Terraforming!!👽👽


